Monday, 4 February 2019

Circuit Playground Express and External Neo Pixels

Circuit Playground Express and External Neo Pixels


https://learn.adafruit.com/adafruit-circuit-playground-express/circuitpython-neopixel

How many neo pixels can I control?

Limited by processing power/speed:

You can drive 300 pixels with brightness control and 1000 pixels without (set brightness=1.0 in object creation). That's because to adjust the brighness we have to dynamically re-create the datastream each write.

Copied from: CircuitPython NeoPixel | Adafruit Circuit Playground Express | Adafruit Learning System - https://learn.adafruit.com/adafruit-circuit-playground-express/circuitpython-neopixel

Limited by Power

For powering the pixels from the board, the 3.3V regulator output can handle about 500mA peak which is about 50 pixels with 'average' use. If you want really bright lights and a lot of pixels, we recommend powering direct from the power source. On the Circuit Playground Express this is the Vout pad - that pad has direct power from USB or BAT, depending on which is higher voltage. 


What else can I do with the board at the same time?

Hmmmmm


Neopixels
https://learn.adafruit.com/adafruit-neopixel-uberguide/basic-connections
https://learn.adafruit.com/glowing-slime-lunchbox/makecode

Thursday, 10 January 2019

Circuit Playground Express

Circuit Playground Express

This year I'd like the electronic architects to go home with a kit.  The circuit playground express is board from adafruit that can be programmed with a block based language like scratch (makecode).  Last years architects said they had all used scratch.  It has lots of sensors and electronics on board - rainbow lights, capacative touch - so you can touch the contact as an input, sound sensors and speakers - standard demo is "blow out the candles" - you blow and all the lights turn off.  Accelerometer - responds to tilt, up and down movement.  With a battery pack, usb cable, a bread board and some wires etc they can learn to interface to hardware and build things at the planting and then take it home and keep using it.

Idea for a kit - circuit playground express - programmed with makecode - like scratch.  The board has multicolour leds, sound sensors, speaker, capacitive touch, accelerometer. infrared send and receive.  Can control external hardware.
Kids can control it and do all the coding because to code is just drag blocks in.
They can take it home, same board has lots of projects on line, can be programmed with javascript, circuit python or c.  

Buy it in Australia - Core Electronics - https://core-electronics.com.au/circuit-playground-express-developer-edition.html - currently $39 ($38 for 10)

Leaves $12 for rest of kit - source some locally and other from ali express.
usb cable $2ish  (https://core-electronics.com.au/micro-usb-cable.html have $3.95)

+ battery case https://core-electronics.com.au/3-x-aaa-battery-holder-with-on-off-switch-and-2-pin-jst.html = $3.73

$8 for

ali express - bread board, power module and wires around $5

 + alligator clips (10 for $2.50) some resistors and some leds

So they can go home with a full kit that they can use at home.  At woodford they can control motors, big strips of lights, external sensors.  They'll go home with a board that has lots of fun stuff on board - and the basics they need to interface to external hardware and some basic experience so they can follow online tutorials or explore themselves.


3d print some cases, motor gears etc.


Links


Features

Neopixels
Sensors
Sound
Power

Connecting It to Things
- speakers -  https://t.co/qgp1s0m4RJ
- external motors
- external leds
- driving circuits
- capacitive touch

Putting it In things
- heat dissipation
- if I put it in a lunch box to make it water proof do I need to worry about ventilation holes?
- if I put it in a stuffed animal, do I need to worry about ventilation
- short circuit prevention - nail polish
- can I use copper tape with a circuit play ground express? 
- conductive thread

Accessories
- how do I connect to a motor - driving board.  Then how do I connect stuff to a motor - gears, pulleys, cardboard

Planting - 3d print different cases for the circuit playground express - eg one that can clip on to a battery mount, servo mount, screw holes, something to gaffa tape on

Project Ideas

 wands with circuit playground express - need a case that can be a star on the end with a cable hole, mount battery on the end

Links to Cool Projects

Useful Videos

https://www.youtube.com/watch?v=cofElsolYk4


Saturday, 28 April 2018

Motors

Motors

Servos


DC Motors


https://embetronicx.com/tutorials/tech_devices/l293d-motor-driver-working/
https://github.com/espressif/esp-idf/tree/master/examples/peripherals/mcpwm/mcpwm_brushed_dc_control


http://www.instructables.com/id/DIY-Motor-Driver-With-ESP32-Controller/

Resistors

Resistors


Ohms Law

V=I x R
V = voltage (Volts)
I = current (Amps)
R = resistor value (Ohm)

The ESP32 uses 3.3V logic
The current should be less than 25mA  (.025A)
For a switch (resistance about 0 Ohm)
R = 3.3V / .025A = 132 Ohm

LED (~ 2V if it's a old fashioned red, yellow, green, orange one)

V = 3.3V - 2V = 1.3V
I = At most 25 mA
R = 1.3V / 0.25A = 52 Ohm

But that would be really bright and use up our battery quickly
(Power = VI)  So we'll use something bigger eg 1k or 2k.


You can use a multimeter to work out a value of  a resistor.
You can also read the colour bars:

About resistors and a colour chart


http://www.resistorguide.com/resistor-color-code/

Resistor Calculator  - put in the colours and it will tell you the value

http://resistor.cherryjourney.pt/


Hardware

Hardware

Output
  • Motors
    • Servos
    • DC Motors
  • LEDs
    • On-board LED
    • Standard LEDs red, yellow, green 
    • neopixels - multicolours
  • Infrared transmitter
  • Piezo sounder
Input
  • Push Buttons
  • Capacative touch
  • photoresistor
  • infrared receiver
  • Varistor
  • Pir movement sensor

Transistors
https://learn.sparkfun.com/tutorials/transistors

Software Setup

Notebook Setup


Linux - Debian - Gnome

Alt-TAB to swap between different programs
Alt-` to swap between winows of the same type (` is above the left TAB)


Arduino IDE - edit code and program ESP32
Fritzing - Breadboard wiring

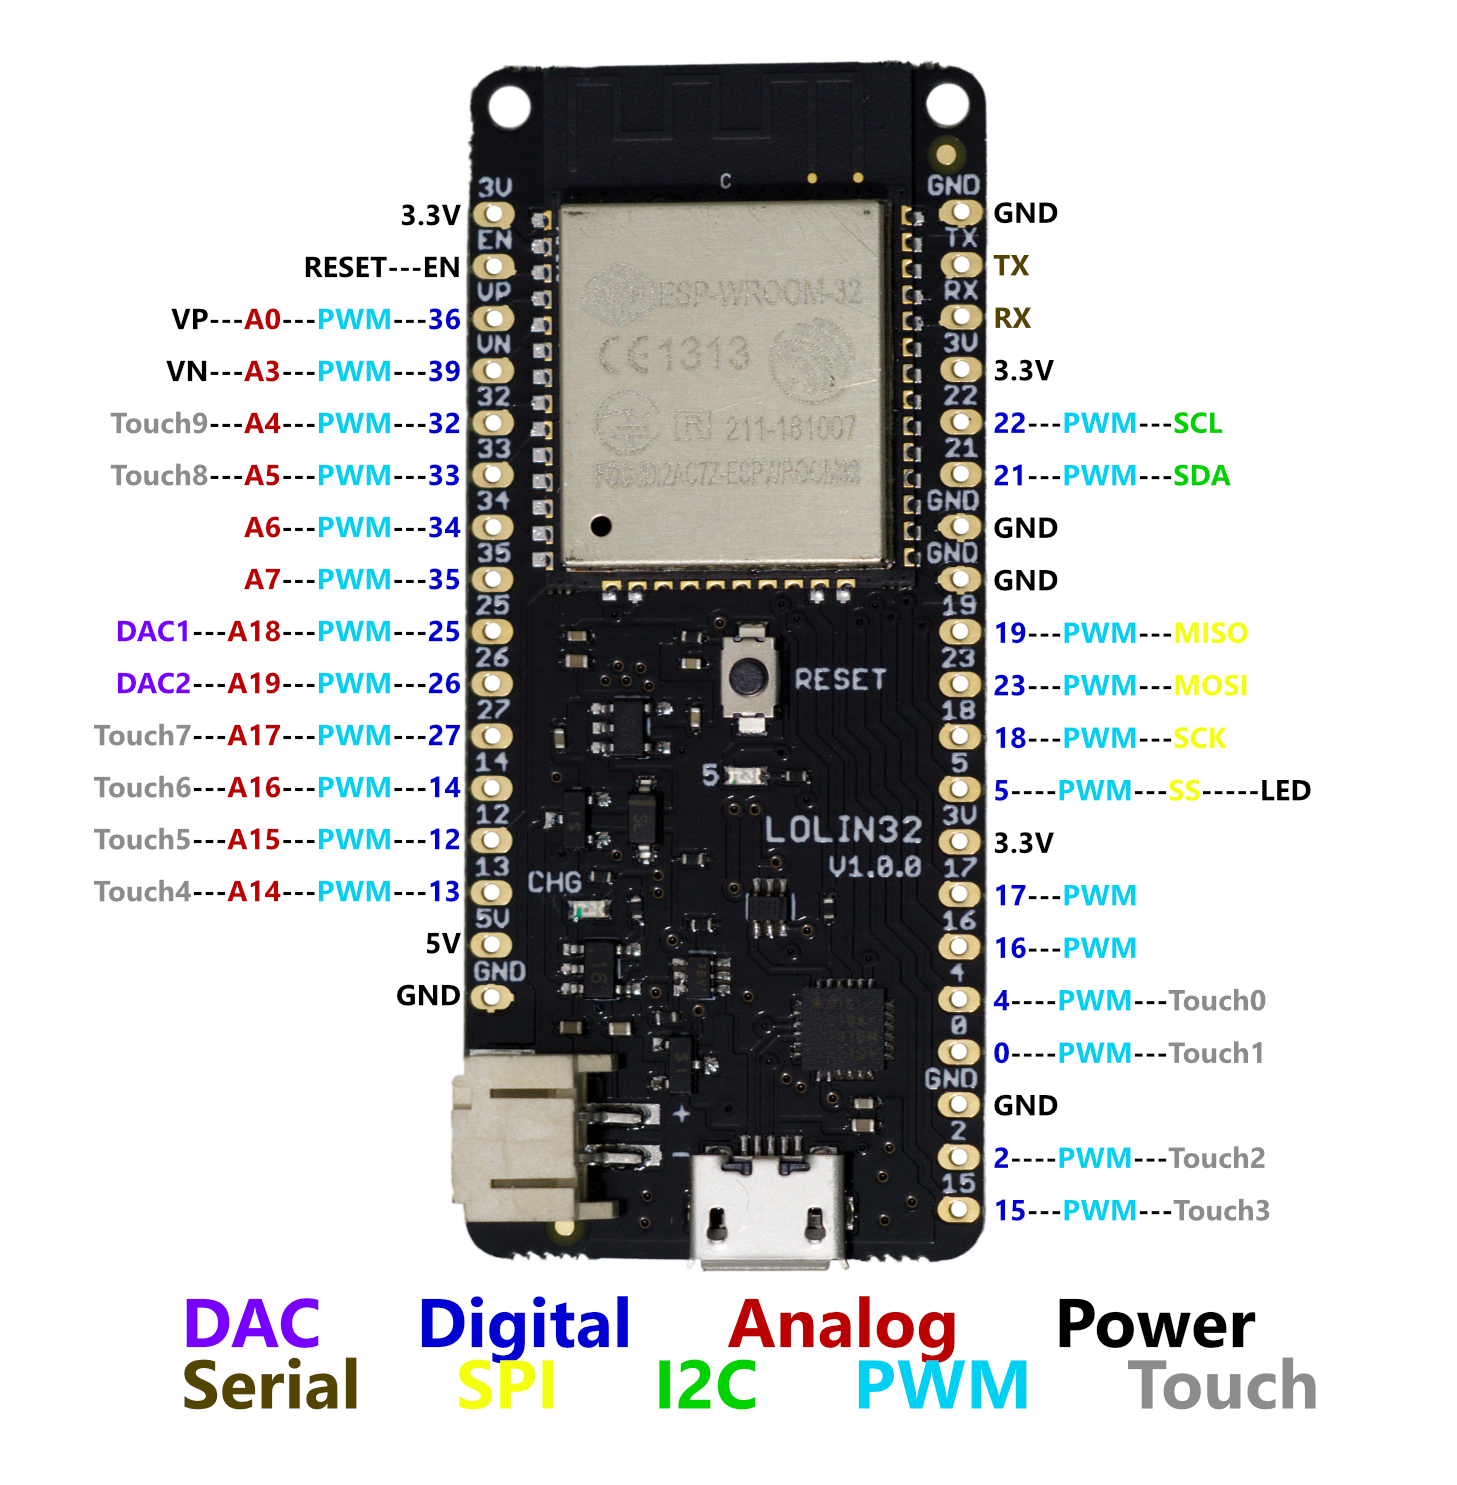
ESP32

WEMOS Lolin32 ESP32 based Microcontroller


Microcontroller - a CPU with Hardware I/O and WIFI
- You can turn things on and off with it
- You can send it signals
- You can talk to it from a phone or a computer
- They can talk to each other


Short side
Pin 1 = 3.3 V (that will be either battery or from usb (dropped to 3.3)
Pin 2 = EN
Pin 3 = VP - A0  - PWM - I36 (Input Only)
Pin 4 = VN  - A3 - PWM - I39 (Input Only)
Pin 5 = Touch 9  - A4 - PWM IO32
Pin 6  = Touch 8 - A5 - PWM IO33
Pin 7  = A6  PWM I34 (Input only)
Pin 8 = A7 PWM I35  (Input Only)
Pin 9 = DAC1 A18 PWM IO25
Pin 10 = DAC2 A19 PWM IO26
Pin 11 = TOUCH 7 - A17 PWM IO27
Pin 12 = TOUCH 6 A16 PWM IO14
Pin 13 = TOUCH 5 A15 PWM IO12
Pin 14 = TOUCH 4 A14 PWM IO13
Pin 15 = +5 V
Pin 16 = GND

Long Side
Pin 1 = GND
Pin 2  = TX
Pin 3 = RX
Pin 4  =3.3 V
Pin 5 = IO22 PWM SCL (I2C)
Pin 6 = IO23 PWM SDA (I2C)
Pin 7 = GND
Pin 8  = GND
Pin 9 = IO19 PWM MISO (SPI)
Pin 10 = IO23 PWM MOSI (SPI)
Pin 11 = IO18 SCK (SPI)
Pin 12 = IO5 = PWM S5 (SPI) On board LED (Pulled up - inverted) = GPIO2
Pin 13 = 3.3V
Pin 14 = IO17 PWM
Pin 15 = IO16 PWM
Pin 16 = IO4 PWM Touch 0
Pin 17 = IO0 PWM (Touch 1 disabled because the reset button is attached)
Pin 18 = GND
Pin 19  = IO2 PWM Touch 2
Pin 20 = IO15 Touch 3


Useful Links

https://wiki.wemos.cc/products:lolin32:lolin32